Pages

Thursday, February 28, 2013

Undead Assault on maths

Its time to start planning my tower... so I did a quick bit of finking and used the measurements of the minis in the picture to extrapolate rough proportions for my keep.  9x14 should do the trick, though I may adjust this for playablity... after all, my models are on 30mm bases... so they will have to have room to stand.  My cunning plan is to make the upper floor of the keep to take the bases, then work down the front wall down to the sally port, then do the front where the bridge connects.

Extrapolating lengths based on known variables.... kinda.

I have yet to get me some of those pillars, but already have the sally port and front door, so the bridge will have to be stage 2.  I am thinking about taking a mould of these and casting these in resin simply to reduce the weight and allow me to make the doors open-able for gaming.  I will go with the authentic models to start with, then explore this avenue later.


For the table, I am planning something a bit special.  Instead of digging down for the river, I am planning on building up from it.  The gaming table boards will be entirely made up of glossy, murkey green water.  The ground sections will be individual island modules that are placed ontop of the water.  I ordered a tub of magnetic responsive paint- basically enamel house paint with micro iron balls in it.  I am going to try this as a layer below the glossy water effect and see if I can get magnets to adhere to it.  That way any islands I place on will stay put!  I am planning on doing this with a dungeon board as well.

The keep, cliff face and sally port will all be one module, the bridge will connect to this with magnets.  The stone archway, mushrooms and hill will be seperate peices mounted on MDF, and these will sit on the islands.  I have already started the giant mushrooms using wire on heavy washers and magic sculpt.  The caps are shaped over citadel paint tubs.

The major change I will be making is the ground texture.  To be honest I always thought the one John used looks jarring and ugly.  After painting the Undead leader with the exact matching colors on his base... yeah... uhg.  Not really going to make me happy unless I do something more modern and natural.  I will be using a mix of mosses, flock and leaf scatter for a more natural look- keeping towards the catachan / camo greens I used to use a lot on my bases.

The stonework is a concern to me.  I will be making my keep from foamcore, so that expanded foam cell look will have to be sculpted on- perhaps with a thin layer of magic sculpt.  I may have to carve it from EPS now I think about it.  I may just modernise it a bit with pencil carved eps and give it a slightly different, more detailed look- as, even as a kid... it always looked like foam packaging to me.  Not sure yet.  What are your thoughts?


Undead assault: new arrivals

These tasty little morsels arrived today,  a couple of vital missing members of the John Blanche Undead assault project.

Barring this project, I am cutting way back on my collecting this year to focus on painting and enjoying what I already have.
Though assembling complete sets of things is dead satisfying (especially arranging them all together for the first time) it will be more satisfying having the figures done and varnished rather than dwelling in storage.
The time I spend scouring ebay, posting feedback, opening packages, stressing about late arrivals and filing away figures can be better spent this year.  I am dead exhausted most days- time management is now really critical to my mental brainythinkyproper wotsit...  so setting aside one part of my hobby will help immensely.

My current painty time has been marred by bad weather with bad timing... either too hot to work in my studio or too wet to spray or varnish.  I have done a few minutes here and there- but nothing worth posting yet.  Three members of the emerald dwarfs are base coated and one eyed Brunhilda is mostly done.

I desperately have to finish my new Darkling Bederken minis so I can get them up on the site, and I have an elf army from Splintered Light I still need to prime up for Skulldred.
Busy, busy...

Tuesday, February 19, 2013

Hoff to a good start...

A quick pic of my hoffbeat painty rest break... I feel better after messing around with these.  Its got my juices if not flowing, but defrosted enough to peel off the cling film and stick it back into the mental microwave.
The spaced out druid is fun, but I really should have done a bit of a proper fill and file as he is from the era of rough surfaces and crappy fingers.  Not sure what to do with his lantern yet.  I may do source lighting, but he is already pretty light.  Hmmm.
WF Spaced Out Druid, Asgard Adventuress, GW Chaos Cultist, Confrontation Hybrid
The Asgard adventuress was the first in a whole slew of bare bristol warriors with crossed straps.  Citadel did a bunch almost identical several years layer which appeared in fighters and chaos fighters and I think Ral Partha did one too but I will check on that... I will do a side by side shot once the others are painted up.  Needs a lot of work on the eyes still, and I suspect she should be a brunette... (opinions below)  She had bug eyes, which is always hard to paint... and is generally poorly sculpted except for the obvious bang on bits.  Anyone know who sculpted her?  Still, nice to finally have her transition from ugly grey lump to ugly colorful one.  More polishing required before varnishing.
Third up is one of the snap together chaos cultists from dark vengence. 
How exactly does dark vengence differ from regular kind?
I decided to go way out there with style, painting them to be gleering out of the darkness with source lighting.  For colors I am keeping tightly with orange vs midnight blue, and keeping them muted.  The base is a Renedra 25mm plastic base.  Yeah, yeah but it will work better in tightly packed necromunda hives.
Finally is the lovely confrontation hybrid beastie from Rackham.  One of my Skulldred playtesters is using the system to resurrect the Arkalesh game world... and I love that idea.  I have enough rackham to make large dirz, goblin and undead warbands, as well as a good fist full of smaller bands.
Painting this guy is F.U.N.  plus I realised if I kept the basing simple grey flag stone, this versatile bastard is ideal for Inquisuitor, weird world war, nurgle, warmahordes cryx, modern horror and cyberpunk genre games.
Thus I went with a green metal armor and offset this with purplish hues for the flesh.
Oh you can see some bob olley dwarfs from mega minis just behind on my painting rack.  These will be appearing in Skulldred if all goes to plan.  I painted one with a white undercoat and cried 'sod this 'after a couple of hours and sprayed the rest black.  I just have to face it... I am a black undercoater.

Monday, February 18, 2013

Reward yourself with Hoff break

Before I explain Hoff break- I can happily confirm Aussie Import Cheaper than cheap ass matt enamel spray beat my expensive GW can, after I blazed through my collection in a primer frenzy.  It does clog though, so you have to wipe the nozzle with a rag every ten minutes, but boy you can prime a LOOOOT of minis for a few bucks.  I switched back to matt black and the results are just dogs danglies.

Its a truely flat black- feels like a chalkboard- not satin as I expected.  It worked a treat on the cheap as chips chaos cultists I bagged at CANCON so that ticks plastic off, a forgeworld psyker, do thats resin checked and metal... well, it does bukkit loads of that too.
As I went back over the figures I primed skull white I can definately say it has mileage, as my can is still going some fifty figures on where the GW can gave up.  Excellent!

Anyway, back to the HOFF break thing...

I have been dividing up my time methodically this month, trying to find that happy work/life/business/hobby balance, and I realised I was not actually having very much fun in the latter.
This struck me as a little strange- I am after all, neck deep in lead n paint.  I should be happy as a pig faced orc in a M.U.D.

I realised it was because I was in factory mode.  Hobby WAS work.  My great escape from the pressures of life is to kick back and make something dull and grey come to life.
What I have been doing is rinse and repeat tasks which, though burning through my assigned to do list, is hardly an escape.
Even my current lifetime dream project 'undead assault' was calling for wave after wave of brown clad undead in a little factory line.  A change is needed...

Now I have to say, I am definately winning the war on lead-valanche... (that moment when you scream "I have too many minis!"-) having rebased, magnetised, polished, repaired, primed, textured, glued, undershaded and glazed my way through hundreds of figures since I last posted a shot of all my trays... but for all this progress I am not getting any 'runs on the board'- finished minis to proudly drool over for my self.

I decided to take a break and dust off something really FUN to do.  A 'Dust off' day... which my wife heard as Da Hoff day.  Like I don't already celebrate that...  geesh.

Now what shall I enjoy painting?  Hmmmm.... rummage... rummage...

Aha!  Perfect...

A confrontation Dirz Hybrid monstrosity.  Big, kick ass and intimidating as the Rackham PJ was so daaaamn good.  What else?
A Kev Adams beastman...  Spaced Out Druid... that boobs out Asgard female adventurer sitting on my shelf and.. ooh, a sample chaos cultist from my new army.  Right, that little lot should cheer me up next hobby session.

Do you need a Hoff break?  You do look a little sunken...  go on, dust off something really out there to paint!

Post your selection in the comments below if your joining me!

Monday, February 11, 2013

Repainting plastics tips

By request here are some tips on turning prepainted plastics into proper minis.
First you need a proper blade... dont mess around with craft knives here, go get a surgical scalpel from your art store.  Be ultra careful with these as you can cut yourself down to the bone with ease.
The super sharp blades will cut through the vinyl very easily without pressure, so you can trim back the mould lines with gentle strokes.  Always cut away from you, and in fiddly areas try to cut away from details towards boring areas.
Its a good idea to sever the model from its base before cleanup- I use tin snips to do this.   For thin footed models I like to leave a little base tab to anchor the figure to my new base.  Its better to make big hacking cuts away from feet, then trim back with your scalpel.

To hide the mould lines and fill the slight nicks and ramps from misaligned moulds you can use either expensive liquid green stuff from games porkchop, or grab some acrylic heavy sculpting medium aka texture paste from your art store.  This acts pretty much exactly the same but without the green dye. You can add industrial talc or baking soda to make it thicker too.  Vallejo do a plastic putty too.  All pretty much the same thing.  Its really thick acrylic paint medium.
Damp a brush and smooth this goop into the cracks.  Wipe it with a wet finger so it is only in the cracks.  Once dry, gently brush on more to cover the filled seam.
The acrylic paste can also be stippled on to add texture to parts of the model.
For really thick gaps try slow setting zapagap and sprinkle on bicarb soda.  This sets rock hard, so keep this for solid, hefty models that do not flex much.

For any big changes, and to repair any accidentally severed feet, try green stuff (duro-kneadatite) as this is really sticky and  flexible so will go with the bendy vinyl.  Green stuff, dispite the marketing, it not the best filler in most cases.  However here the flex is important.

To strengthen limbs, carefully drill into them and insert a sharpened wire or pin.  I usually poke several pins in coated in superglue, then clip off the excess- poken them a little deeper with pliers and fill the hole behind it.

With swords its usually best to snip them off and pin on a plasticard or metal replacement.  I use greenstuff and a thick filling superglue like delta thick or zapagap to anchor it into the vinyl hand.

Stripping the paint is possible, but its best to just paint directly over it.  If you have to strip, use cotton tips dipped in nail polish remover... dettol won't usually work on this paint.  The rubber is easy to damage so go slow!

Rather than undercoat, I just brush evil empire lahmian medium on my models as a base.  It one of their few paint products worth every penny.  It kills the gloss immediately and gives a nice surface to take washes.

Citadels sadly oop foundation paints thinned slightly are the best paint for recoloring.  The current base paints are hella shiney.  Go lightly on your paint passes as detail is often soft.  I find a light drybrushing of white helps bring out details and helps the layers of paint stick on too.

Finally its a good idea to varnish the ever living crap out of the model... a flexible acrylic varnish is best.  Light coats of watered down weldbond will do the trick too.  This hardens up a bit too, and I suspect stiffens the model up a tad too... but it may be my imagination- I have not done a side by side comparison as I have yet to do doubles of the same figures.

If your feeling fancy, try sharpening up some of the soft edges.  Build up an edge with greenstuff and once its totally dry slice sharp with your scalpel.

I will post some pics of mine later... got me a wicked warband of crocs!

Friday, February 8, 2013

I cast resurrect!

I spent this evenings hobby time blocking in colors on the undead I currently have for the assault project- and have spotted a few of the missing figures on ebay that I will land with any luck (you can help by not bidding on fantasy tribes undead or skull faced preslotta chaos warriors for a month or so ;).
I found VMC german uniform dark brown perfect for the cool browns of the cloth, and adding citadel dark flesh got the warm highlights.  The greener zombie flesh is parchment liquitex and catachan green.  For the guts, john goes for the complamentary orangey red- a pairing he uses even today on his space marines.
These figures are really quick to paint- and it strikes me that John would have taken far less time to complete the diorama than I first thought.
I decided to base the hordes on a mix of 40mm round bases (poker chips) in batches of three, and some singles on 25mm x3m rounds.  Champions and necromancers are getting 30mm bases to differentiate them from the rotten rabble.
So far I have twenty of the horde moving along nicely!

Whilst I had the putrid skin colors mixed, I blocked in another wave of figures not for the project- some kev adams zombies, Malifauxs bette noir, a few chaos thugs and my female nurgle gun conversion of the nurgle lord- which is exciting because she has been loitering on my desk since xmas.

I also managed to get the bases painted up on twenty or so minis... a bizarre mix of repainted Dreamblade figures, heroclix and DND plastics that I have been itching to game with.  I rebased them all on mdf rounds yo match the rest of my hordes.

Its nice to feel some progress happening.

Sunday, February 3, 2013

Undead assault pt2

Just a quick post whilst I am on my way to work...a quick and dirty smartphone snap showing the dwarf warband so far.

The double handed weapon adventurer is not in the best condition as his sword is mostly missing and he was very tarnished so I still need of a replacement.

Behind the sally port door you can just make out the dwarf thief that is pictured on the watch tower in a tasteful floral green number.

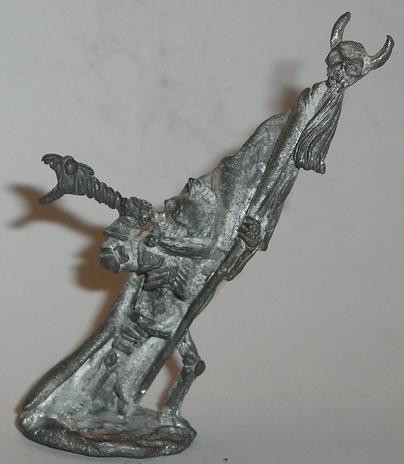
Sneaking in on the right is the Tom Meier Wraith that was zapping the door.  The figure is dated 1976- which if I check my own base... yep... its as old as me.  Its one of the first dynamically posed models as far as I can tell, and a masterclass in drapery.  This puts it firmly in the most influential minis of all time in my opinion.
  It, like a handful of the undead minis pictured are Ral Partha imports.  Citadel handled the license in Europe at the time.  You can still buy these from the pleasantly perky folk at iron wind metals.

Which reminds me... must find a broken Jabberwocky too.  I already have one done up in the same colors (previously blogged) but a submerged undead munchy one would be brilliant.

I am thinking I should make some 40mm multibases of undead, and make sure my bridge and arch can take that width.

Thanks all for the support so far!

Saturday, February 2, 2013

Undead assault hunt

The John Blanche undead assault project is starting to take shape- thanks to the very special arrival of the Nottingham Dwarf previously owned by the late John Garland and donated to the project by J. Fulford in his memory.  A very special figure indeed- not only rare, but rare because it marked a time and a place in our hobby- the opening of The Nottingham GW store where John picked it up. More on John and his dwarf as I dedicate a post to its restoration.  Cheers JF!

The robin hood dwarf fills the biggest gap in the recreation of the diorama that has held me back from dedicating time to the project- and now bristling with energy I gathered together all my bits so far.  Pretty darn close!

So do any of you lovely folk have any of the pictured minis?

Two dwarf adventurers (halberd and twin weapons), the guard and armorer from the kings court on roof, a skull headed chaos fighter with mace and
I also need the fantasy specials pillars used on the bridge.

I have both the fantasy special doors ready for the castle, and have based and primed most of the figures so far.  I had to lay them all out like the diorama to check I had the right variants... gosh that was cool.  I cannot wait to paint these all up!

So my plan is to have two warbands complete with correct banners and a modular table that features a copy of the castle, bridge, hills and shrooms.
The undead force will feature key characters first, expanding to get as many as I can match done.
I was already mostly done with the ray casting wraith at the door, chaos lichelord on the hill, FA necromancer, ral partha samurai liche, two ghouls and ten of his horde.  It wont take long to get those to a photographable state.

Exciting stuff!

If anyone has any photos they took of close up details of the diorama please drop me a line.  I am keen to get a good shot of the dwarfs on top of the castle so I can see their colors, and what looks like a spear thrower the armorer is working.

Thanks!